Monday, April 4, 2011

Operation finish studio nearly complete!

When I moved in to my studio I planned out nearly every part of it.  I didn't plan out every exact detail, but I did come up with a basic blue print for where all the furniture, storage and art would go.  Since I moved in, I worked hard on fulfilling my grand scheme.  As of a couple of weeks ago, I counted about 7 or 8 more projects left for the interior.  In the past week or so, I hammered out 5 of these!  Half these projects were to just fill spaces that felt empty.  The first space I took care of was the corner by my front door.  A friend of mine gave me two masks to add to my collection, which fit nicely besides the two similar ones hiding behind the wood screen.


The next space I was able to tackle was the horizontal space above my closet doors.  I knew I wanted some sort of sculptural piece using materials in a more raw form, either be metal or wood.  I knew that once I saw the right material the sculpture would practically create it self.  A couple days ago I was asked to look at some material for a client of mine who had a source for old and reclaimed wood.  While I was looking at the amazing selection of wood saved from demolition projects, a couple turquoise painted trim pieces popped amongst all the pale and grey colors.  These pieces would make my next little art project.  All it took was some pocket screws, scraps of 1x3 wood, and some tools.


As you can see from the picture, I also got these awesome rusty cogs!


I was also happy to find something to put next to my fridge, an orange magnet board from Ikea as-is.


Now for the functional pieces I finished.  First there was the bed frame.  I knew I wanted to replace my box spring with a bed frame, but kept putting it off till I found the right thing to kick off the project.  As usual, I was able to find exactly what I needed in the Ikea As-Is section.  They had a three piece metal frame with with bent plywood supports.  The base frame was made from 2x3's, some plywood support corners, some finished feet from a builders surplus place, and some upholstered panels I made from some wood boards, foam, and fabric I had.  Everything came together great until I found it was 2 inches wider than expected and I had to unscrew my wood panel from the wall and move it over.


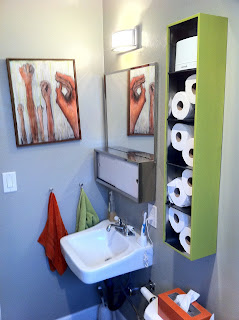
The second item I got was a medicine cabinet.  Since I planned out my entire place, I decided I wanted a green medicine cabinet to go above the toilet, something you might find at CB2.  Only this past weekend was I lucky to find something at the Ikea As-Is that would work.  It was a tall narrow stainless steel box missing its shelves. 


I gave it a light sanding, primed it in white, and painted it Krylon Ivy Leaf.  I was able to use some left over smoked plexiglass for the shelves.  I might add a door later on, but for now I'm very happy to have that project out of the way.


With all those items checked off my list, I just have to make a head and side board and some art work for a couple more empty spaces.  Stay tuned!

Thursday, March 24, 2011

The highest quality work I've done to date.

A couple years ago I decided to take some community college classes for fun.  The list included a small business class, rock climbing, karate "yes, I took karate", and a furniture design class.  The furniture class turned out to be more of a wood shop class.  Our first and only project would be a bench.  The one part of the assignment we had to follow was using mortise and tenon.  If your unfamiliar, the mortise and tenon is one of the oldest and most common joints in the world. Here's an example:


 We we're encouraged to come up with a number of designs.  Although we could use different materials, it was a wood shop class and it was treated as such.  I knew I wanted to use at least two different materials, and after seeing the price of wood, I decided I would go with Red Oak, which when stained looks pretty good.  After sketching several designs, I started to focus on an Asian style which has always influenced me.  At the time my old bedroom had a large mural of a Bonsai tree on it which I wanted to incorporate in to the design.


To do this I chose to have a brass cut-out centered on the two bench legs.


 To balance the brass out I would add brass pins or buttons to the sides of the legs and the top of the seat.  They would be made to look as if they were holding the pieces together like nails.  I would choose to stain the bench a red mahogany which would compliment the yellow in the brass.

 To fit the brass tree with in the legs, they had to be composed of two panels on each side with the tree sandwiched in-between.  I first had to cut out the holes from the center.  The legs tapered in towards the top on all sides, so I had to make a jig to hold the pieces in place at an angle while it was run through a large drum sander.  The angle on the thinner side was cut off by band saw and sanded straight once the pieces we're glued together.


In the second picture you will notice a slight curve cut out from the bottom, this was also done to the large tenons that hold up the seat and the top of the seat itself.  These curves were done in relation to the circle cut out on the legs and in contrast to the hard edges of the tapered legs.


While I did the wood work at school, I did the metal work  at home.  The tree's were cut out on a scroll saw from 1/8" brass sheet.  After breaking so many saw blades I went out and got a Dremel tip to do the more detail work.  the brass would eventually get sanded and polished.


The brass pins started off as a 1/2 inch brass bar cut in to little pieces.  I put the pieces in my drill press and shaped them with the Dremel.  That was followed by sanding and polishing.  

The large tenons supporting the seat protruded out from the legs and were curved on two sides to resemble horns, or something from Japanese architecture.


The seat was supported by two hidden tenons that allowed the seat to sit spaced from the rest of the bench.


My biggest mistake in the whole bench is that little opening in the above picture, I accidentally measured wrong and put the mortise in the wrong place.  It took a plug and some putty to patch it up and is barely noticeable unless you know where to look.  Once everything was glued together, I brought it home to stain and a clear coat with Deft semi gloss.


The last touch was adding the brass pins.


Although it was unintentional, the mirrored surface of the brass trees gave the effect that they were transparent.


And that my friends is the finest craftsmanship I think I have done to date, but you can guarantee it wont be my last.  Hats off to professional and amateur carpenters.  As much as I enjoyed this project, I'm not sure I would always have the patience to obsess over all the details when done by hand.